BOMBER FORMATION & BOMBING TECHNIQUE
(ADAPTED FROM THOR'S BOMBING GUIDE)
FORMATION RULES & GUIDELINES
1. NO DEFENSIVE MANEUVERS - while flying in formation. It is unrealistic and jeopardizes the entire formation. It also breaks the defensive and offensive integrity of the formation.
2. FORMATION INTEGRITY - as per point 1. above. Keeping a good formation helps the offensive intent by maximizing bombs on target. Keeping a good formation also helps the defensive by maximizing the defensive capability of the gunners. Stragglers are expendable. If out of formation due to damage and unable to rejoin...drop your loadout and head for the deck and home as quick as possible. Buddy up if at all possible with any other damaged bomber(s) doing the same to provide mutual protection en route home.
3. DO NOT USE LEVEL STABILIZER - unless you are the lead or you are at final altitude and can engage properly without disrupting the formation. i.e. straight and level flying.
4. BOMB RUN - if the formation is good and tight then utilize the techniques described to the right on this page. If desired in a good, tight formation the non-lead planes can drop when the lead ship drops. Theoretically that should still result in a good bomb drop for all. DO NOT FORGET YOUR BOMB DOORS!!!
5. GO-AROUNDS - No single plane should 'go-around' by itself. It is highly unrealistic and inevitably leaves a single bomber to the mercy of concentrated flak and fighters. The Squadron Leader should make the call and if necessary take the entire group on a go-around OR select the alternate target OR abort the mission completely.
6. SQUADRON LEADER -
a. NEVER flies at 100% power
b. Flies at 70%
c. Keep prop pitch at 100%
d. Flies a straight course
e. Trim plane for level flight
f. Use slow turns and shallow banks during turns
g. Give orders well in advance: e.g. "Turn coming up" "Descend to..."
h. Level aircraft BEFORE engaging LEVEL STABILIZER
BOMBING TECHNIQUE (T'S METHOD)
1. You MUST map your bombsite keys in your control and/or keyboard setup. One suggestion is to use the numberpad keys located to the right side of most modern keyboards as they have no function (IF you are using a joystick with a hatswitch to "look around"). If not then any available keys will do, your choice.
2. Make sure you have the "auto level stabilizer" control mapped also (NOT "toggle auto-pilot" that's another thing altogether) this is critical in assisting with the bomb run using the bombsight. Okay, you've mapped your keys, you're in your bomber, now what?
3. Set the bombsight to the altitude and speed you intend to bomb at. This can be done (try and get into the habit) on the ground prior to takeoff or well before reaching the target using your bombsight keys. For example you want to bomb your target from 14,000ft and intend to fly at 200mph. Using the Increase/Decrease Bombsight Altitude keys, set the alt to 14,000. Using the Bombsight Velocity keys set your approach speed to 200mph (see NOTE ABOUT SPEED below). You will see the numbers indicated onscreen. You can change the viewing angle of the bombsight by using the Increase/Decrease Bombsight Distance keys (I usually set this to 70 degrees as it will allow you to see the target in the distance vice looking straight down, you can decrease the angle as you approach the target). OK, you're in the air and on approach to your target, now what?
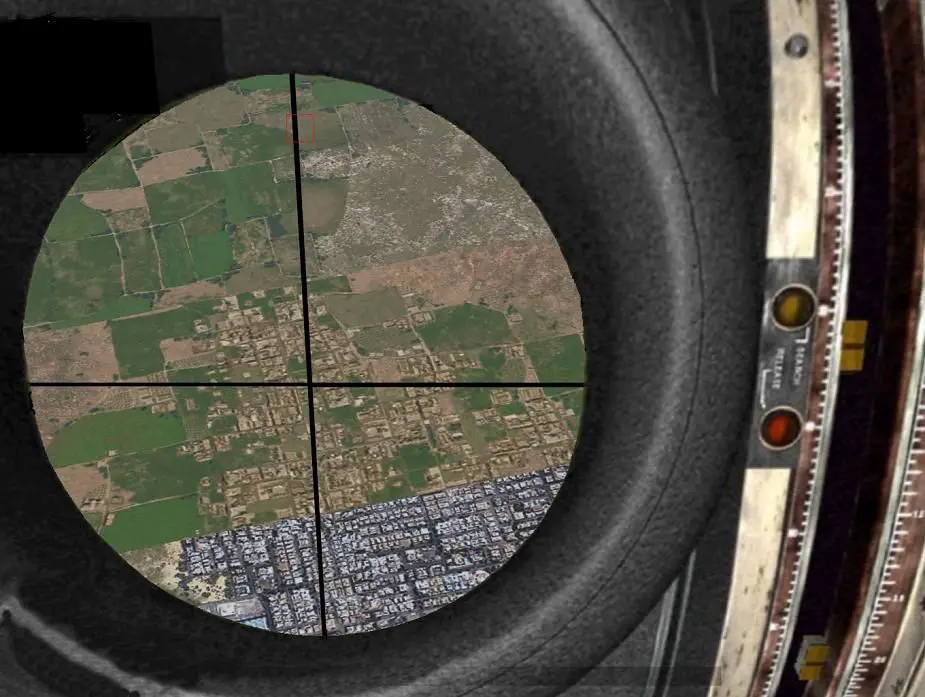
4. As pilot, line up the plane with your target. Engage the "auto level stabilizer". Press the "C" key to go to the bombardier's position then "Shift-F1" to put your "eye" to the bombsight. You will now see through the bombsight to the target area. You should see crosshairs also, unless the plane is still settling down from a turn in which case it may take some time to appear (the crosshairs will disappear/unlock if the plane is moved more than 4.5 degrees during a bombrun therefore SUBTLE movements only during the bombrun). If your target is still in the distance and approaching you can move the crosshairs up or down onto the target using the Increase/Decrease Bombsight Distance keys. If the bombsight is lined up with the target and centered then hit the Toggle Bombsight Automation key to "lock" and you will see that the crosshairs now start to stay with the target. If the crosshairs are drifting vertically off of the target then use your Bombsight VELOCITY keys to adjust it until it remains 'glued' to your chosen spot.
If the crosshairs are OK vertically but drifting or off center in the horizontal then you have a couple of options;
a. If relatively close to the target, at the bombardier's station you can use rudder trim to make fine adjustments instead of the joystick. This takes practice and patience. OR
b. If you are far enough away and have time go back to the pilot position unlock auto level stabilizer and make corrections from there . Reset auto level stabilizer and go back to the bombardier's position and resume your bombrun.
5. If you've managed to set the crosshairs on the target and "locked" the bombsight on then continue to watch the crosshairs to make sure they stay on the target and the bombs will automatically release at the appropriate point and you will see/hear a "bombs away" and the plane will "lurch" as the extra weight is suddenly released.
6. If everything is done correctly you should have the satisfaction of seeing your bombs hit the target (F7, if enabled, should give you the target view, F10 is the bomb-follow view).
7. The left/right sight control is to adjust for wind 'deflection'. It takes practice and a long bomb-run to be able to adjust left or right to compensate for 'drift'. If you have wind speed set to zero then you don't have to worry about this. If you have wind speed set to something other than zero, the previous steps still apply but you also use the right/left adjustment to get the sight to run 'straight'.
NOTE ABOUT SPEED: The speed you are setting into the bombsight is NOT the speed you are seeing in the bottom left of your screen which is the INDICATED. You are setting the TRUE airspeed. A very GENERAL rule is to use the KIAS airspeed as that is close to TRUE airspeed or is close enough that only slight adjustments on the bombrun are necessary.
Now, you're done, right? Nope, not if you want to go further. If you are nice and comfortable with bombing as suggested above you will have noticed that there is no way to adjust the bomb interval if you use the auto-lock (i.e. hit the bomb switch and have just the first two bombs go, wait a couple of seconds then hit the bomb switch for the next pair and so on). There are "bombing tables" (i.e standalone mini-mods which will calculate intervals for you at given heights and speeds) for manual bombing. This is essentially repeating the procedure above without using the Bombsight Automation Key but releasing the bombs manually yourself. If you search M4T or SAS websites they still have bomb tables program (or at least charts).
